How to Draw Your Pistol from an Appendix Carry Position
Dec 2nd 2022

The appendix concealed carry position presents many advantages to concealed-carrying citizens: the gun rests in the holster directly ahead of your body instead of the side, and the carry position makes it easier to conceal larger handguns comfortably. With a bit of practice, drawing from the appendix position can even be faster than traditional strong-side positions.
If you’re interested in carrying your gun in the appendix position, follow these tips to perfect your draw strokes and maximize safety and efficiency.
Use Appropriate Equipment
You must ensure your concealed carrying equipment is appropriate for Appendix Inside The Waistband (AIWB) carry before practicing draw strokes or other training drills. If you have prior experience with concealed carrying, you know that having a robust gun belt and appropriate gun holster is essential. The same is true for appendix carry.
While you can use your existing gun belt if you have one, avoid repurposing your traditional IWB holster for appendix carry. Standard IWB holsters are primarily designed for carrying positions on the side of your body (strong-side, behind the hip bone, etc.) by presenting your handgun at the correct angles for drawing from these positions.
Even if you can install your traditional IWB holster in the correct 12-o’clock position for AIWB carry, it may not fit snugly against your body and cause various issues eliminating the primary advantage of appendix carry: ease of concealment. Potential problems include the holster digging into your body or the handgun grip sagging forwards.
Safely and adequately drawing a gun carried in the appendix position requires different grip angles, which only a dedicated AIWB holster can provide.
How to Choose a Dedicated AIWB Holster
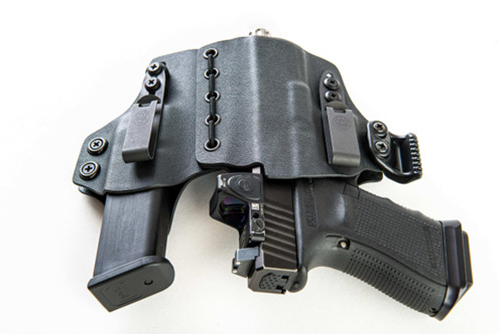
A dedicated appendix carry holster features multiple elements aiding in the concealment of your handgun and ensuring this carry position.
Check that the holster has the features necessary to present and maintain your handgun at the correct angle. Quality AIWB holsters should feature a holster claw, also called mod claw, to apply leverage on your waistband and prevent the grip from sagging forwards and printing.
Your holster should also feature a neutral or near-neutral cant angle, meaning the barrel should be approximately perpendicular to the ground. A few degrees of rotation towards your dominant hand is acceptable and can improve your draw speed.
If you opt for an AIWB rig with an integrated magazine carrier, it should feature a pair of robust belt clips, each one mounted on each end of the shell, to ensure proper weight distribution on your gun belt.

How to Practice Drawing from the Appendix Carry Position
Although it isn’t strictly related to shooting fundamentals, training and practicing your draw stroke is an essential element of concealed carrying and is necessary to become proficient with your preferred carry handgun.
While appendix carry naturally provides quick access to your weapon, you should practice your draw strokes to become as fast as possible without fumbling or performing unsafe maneuvers. Train until you build the muscle memory you need to react to a real-world threat.
The appendix draw stroke comprises six steps:
- Clear the cover garment
- Grip the gun
- Draw the gun
- Present the muzzle towards the target
- Meet and greet
- Get ready to shoot
Below is a detailed breakdown of each step to understand the motions you must perform, what to practice, and what unsafe maneuvers to avoid.
Step 1: Clear the Cover Garment
Begin with your handgun holstered and concealed in a natural standing position, facing toward a safe direction (e.g., downrange). Your objective is to gain access to your firearm by pulling your shirt, vest, or covering garments out of the way, exposing your gun, and allowing you to grip it.
The essential principle is to grab your shirt or covering garment using your non-dominant hand. If you are right-handed, you will need to use your left hand.
Reach for the bottom of your shirt by making a claw-like gesture with your fingers, grip it tightly, then pull it high enough to move it out of the way and clear a path for the gun without it snagging or the shirt binding at any point.
If you have issues reaching the bottom of your covering garment, like a long shirt, don’t bend down to claw your fingers around it. Instead, directly grab the shirt as low as you can and pull it upwards, ensuring the bottom hem is out of the way.
Step 2: Grip the Gun
While your non-dominant hand keeps your shirt pulled up, reach for the grip of your handgun with your dominant hand. The objective is to ensure the web of your hand lands as high on the back of the grip as possible, with three fingers wrapped tightly around the front strap and the index finger over where the trigger guard shield is.
The position of your thumb will depend on your choice of handgun and your personal preferences. If you find it faster and more comfortable, consider resting your thumb on the back of your slide instead of sliding it between the gun and your body to get a full grip. This method can be helpful with handguns that don’t have exposed hammers, such as Glocks and other striker-fired models.
Practice both methods and experiment to see which you find more efficient.
Step 3: Draw the Gun
Once you have established a firm grip on your handgun, you are ready to draw it up and out of the holster. Although it may seem counterintuitive initially, the most efficient technique is to push the handgun down and then pull it upwards. This spring-like motion creates leverage to facilitate the pulling motion, allowing you to draw the pistol out of the holster shell more quickly and efficiently.
Be mindful of your index finger’s position at all times, especially during this step and even if your firearm has a manual safety lever. If you know the pros and cons of appendix carry, you know that one of the potential dangers of this carry position is the risk of a negligent discharge.
Making a mistake with live ammunition at this stage of the draw stroke risks sending a bullet into your femoral artery. Consequently, it is critical to practice safely until you are proficient enough.
Step 4: Present the Muzzle Toward the Target
After the muzzle clears the holster, rotate your dominant hand’s wrist until you point the handgun downrange.
While this step is relatively simple, its purpose is to provide an additional layer of safety and ensure you don’t keep the muzzle pointed down and potentially, yourself longer than necessary.
Step 5: “Meet and Greet”
The “meet and greet” shorthand refers to the transition to a two-handed grip; your off-hand “meets and greets” your dominant hand.
After ensuring your handgun is pointed toward the target, let go of your shirt with your non-dominant hand and place it over your dominant hand until you form a two-handed grip. Keep your trigger finger away until your two-handed grip is complete, as you are not yet ready to shoot.
Step 6: Get Ready to Shoot
The final stage of the draw stroke is to bring your sights up to eye level and align them on the target. If your handgun has a manual safety lever, this is the moment to disengage it. Once your sights are on the target, shoot when ready.
Bonus Tips
Here are a few suggestions to consider while practicing your appendix draw stroke to improve your draw speed and efficiency in multiple situations.
- No matter what you do, remember to respect the rules of gun safety at all times.
- Do not train or practice your draw stroke with live ammunition until you are safe and proficient enough.
- If you’re looking to challenge yourself or increase the difficulty of the drill, consider starting in unnatural or more realistic positions, such as drawing from a seated position, starting with your back turned, or with your hands occupied (e.g., holding objects).
Shop Dependable AIWB Holsters at Incognito Concealment
Incognito Concealment produces a wide range of 100% hand-crafted gun holsters for everyday concealed-carrying applications. We make a selection of 1-piece and 2-piece appendix carry rigs suitable for handguns of any type, from subcompacts to full-sized models, all of which are covered by our Limited Lifetime Warranty.
Call us today at (586) 333-4240 for more information.


